

how to make a calendar in indesign

Build a Calendar in InDesign
Everyone needs a calendar sooner or later. Learn how to easily build one inside InDesign using a script we've provided for you.
by: David Blatner
I'm always amazed at how many people need to make calendars: big calendars, small calendars, one-month calendars, full-year calendars. Fortunately, InDesign offers a "make me a calendar" feature... no, sorry, not really. But it's so easy to make a calendar in InDesign that it's as though the program did have such a feature. The trick is to download a template or script that does a lot of the work for you.
Use a Template
One of the best and easiest ways to make a calendar is to use a template designed by someone else. Search for the word "calendar" in the InDesign section at the Adobe exchange and you'll find a number of free templates.
While most are year-specific, there are a couple called "25-year calendars," such as the clever one rusty Wright built. these contain 28 different master pages, each of which reflect one possible month layout. For example, if January 1 begins on a Monday, you'd apply that particular master page layout to your January document page.
You can also find calendar templates for a small fee. Chuck Green's The InDesign Ideabook includes several calendars on its accompanying disc. note that most of these templates have paragraph styles for each calendar element, so changing the typefaces and overall look and feel of the calendar is typically as simple as editing a few styles.
Use a Script
If you need more flexibility than a template offers, consider using a script to build your calendar for you. One of the most popular and easiest scripts available is called Calendar Wizard, written by Scott Selberg (based on ideas and code written by Jan Suhr, Robert Cornelius, and Steve Nichols). Here's how it works.
1 - Download, install, and run
Calendar Wizard is available here.
After you download and unzip it, install it by putting it inside the InDesign > Presets > Scripts folder (in CS2) or inside the InDesign > Scripts > Scripts Panel folder (in CS3).
 Note that this gives you four files: the script to make the calendar, a script to realign the calendars, a script to fit a calendar to a frame, and a readMe file with lots of good information on how the script works and how to use it.
After installation, you'll immediately find it in InDesign's Scripts panel (Window > Automation > Scripts). To run it, double-click on it in the panel (Figure 1). If you get an error at this point, simply open a document, then double-click on the script again.
2 - Choose the Date Range
The first two items in the Calendar Wizard dialog box (Figure 2) are straightforward: They let you choose the starting and ending months and year(s) for your calendar. You can pick any year from 2004 to 2017. If you were hoping for 2018, you'll have to wait until next year; the script looks only 10 years ahead.
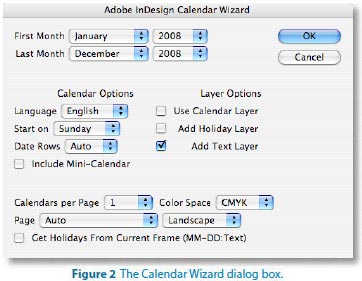
3 - Pick the Calendar Options
You can choose English, German, French, or Spanish from the Language pop-up menu to change the way the text appears (Figure 3). Next, pick whether you want the left column to be a Sunday or a Monday.
Note that some months take up only five rows and some take six. (If February 1 lands on a Sunday, it'll take 4 rows.) In general, you should choose Auto from the Date Rows pop-up menu, but if you want to force all the months to the same number of rows, you can choose that here.
If you turn on the Include Mini-Calendar checkbox, you'll get small versions of the previous and next month's calendars inset into each month's calendar. This takes longer to build and creates many more objects on your page, but it can be a good addition to one-month-per-page wall calendars.
Adding Holidays to Your Calendar
While version .9 of Calendar Wizard is on the Adobe Exchange, the script's author, Scott Selberg, has provided us with the newest version of Calendar Wizard at http://downloads.indesignmag.com/ supportfiles/. Version 2.0 has several new features, including creating and applying table styles and the ability to insert the names of holidays into the proper date locations automatically.
The trick to adding holiday names to your calendar is to type them using a special format into an InDesign text frame. Each holiday should be on its own line, and in this format:
1-1:New Year's Day
2-14:Valentine's Day
Don't put a zero at the beginning of each month! Just the month, hyphen, then date.
You can find lists of holidays on the Web at timeandate.com and on Wikipedia.
4 - Choose Layer Options
One of the coolest things about CalendarWizard is that it can make good use of the Layers panel. If you turn off all the checkboxes in the Layer Options section, the whole calendar is placed on Layer 1. However, I prefer to turn on all three checkboxes to produce the following:
- The calendar grid (along with numbers and text) on a layer called "calendar"
- An empty duplicate of the grid on a layer called "calText," which lets you easily add text at the top of each calendar cell.
- An empty duplicate of the grid on a layer called "calHolidays," which lets you easily add the names of holidays at the bottom of each cell. If you add holidays automatically (see the sidebar "Adding Holidays to Your Calendar"), this layer is always created for you.
5 - Pick a Page Setup
The last settings in the dialog box control how calendars are laid out on the page. You can pick how many months should fit on each page, whether the page layout should be portrait or landscape, and whether to create a new document or fit the calendar into the current document (Figure 4).
If you had a text frame selected on your page when you launched the script, you can also choose Current Text Frame from the Page pop-up menu. In that case, the script places the calendar (but only a single month) into that frame. That's particularly handy when you need a calendar to fit a specific size and position on your page. When the pop-up menu is set to Auto, and you have a text frame selected, the script automatically places the calendar into that frame.
6 - Create the Calendar
When you click OK, the script jumps into action and builds the calendar (Figure 5). This can take up to a minute or more (especially with minicalendars), so be patient.
Unless you've targeted a text frame for a singlemonth calendar or you have a text frame selected in your current document, the script builds a new document for you. The size and margins of that document are based on the last-used document preset (that is, whatever you last chose in the Document Preset pop-up menu in the New Document dialog box).
7 - Add Custom Text
This script creates calendars as tables inside text frames. The numbers and text are in the cells of one table, and—if you added a calHoliday layer or a calText layer—you'll find one or more duplicate tables on other layers. If you want to insert additional holidays into the calendar, open the Layers panel and Option/Alt-click on the lock column next to calHolidays layer (Figure 6). This locks all the other layers, and leaves this layer unlocked. Now you can click with the Type tool inside a table cell and type the holiday. Similarly, to add to the Text layer, Option/Alt-click next to the calText layer to lock all the other layers.
8 - Format the Calendar
The calendars that CalendarWizard creates aren't exactly beautiful right out of the box. Fortunately, the script builds a number of paragraph styles, table styles (CS3 only), and color swatches. Edit the styles and your calendars update to look far better. If you're going to print your calendar, check the color space of the three color swatches it creates: DayCellBackground, DayTextColor, and Holiday. In the publicly available version .9, they're all specced as RGB colors. If you use the script attached to this PDF, they're likely in CMYK mode. But if they're RGB, then right-click (or Control-click with a one-button mouse on a Mac) on each of these colors in the Swatches panel, choose Swatch Options, and set the Color Mode to CMYK. The two DayCell swatches control the color of the text and the cells behind the day names ("Monday," "Tuesday," and so on). The Holiday swatch controls the color of any holidays you type on the calHoliday layer.
The first paragraph style you should change is the "cal_base" style, on which all the other styles are based. By default, the font is set to 12-point Times. Change this font, and it will change throughout the calendar.
If you're using Calendar Wizard 2.0 in InDesign CS3, you can also edit the styles in the Cell Styles and Table Styles panels (Figure 7). For example, if you want the cell containing the month name to have a particular fill color, change the cal_header cell style. To change the border around the frames, change the table style called "calendar."
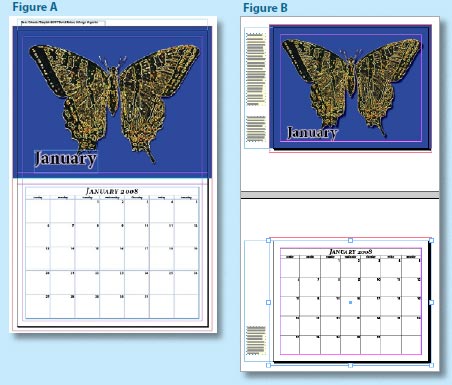
Laying out a Document Vertically
InDesign is so flexible, you'd think it would be easy to lay out a spread vertically instead of horizontally—so that the spine is at the top and bottom, which many wall calendars require. Unfortunately, it isn't easy. However, Anne-Marie Concepción came up with a great workaround you can read in full at InDesignSecrets.com. Here's the gist:
- Lay out the entire spread on a single page. For a 12-month calendar, you'd create 12 tall pages, each containing the image and calendar (Figure A).
- Save the InDesign document.
- Create a new InDesign document at the finished page size (half the height of the calendar).
- Place the original InDesign document into the new one. (If you're using CS2 or earlier, you'll need to export a PDF of the tall document first and import that instead.) The first page of the new document should contain the top half of the tall document; the second page contains the lower half; and so on. If you used bleed guides in the original, full-height document, you'll need to adjust for that in the Import Options dialog box when you import it.
In this model, you design in the tall document and print from the half-height one (Figure B). Then, whenever you edit the tall document, update the modified links in the Links panel of the print version.
By the way, if you're making more than one calendar, just set the styles in one document and then choose Load Paragraph Styles in the Paragraph Styles panel menu to copy them from one file to another.
9 - Resize or Realign the Calendars
When you've created holiday and text layers, it can be frustrating if one of the grids gets out of alignment (Figure 8). Let's say you change the height of the month name to be too large for its row. You can use the Type tool to adjust the row height, but now the holiday and text tables are out of alignment. Simply turn to a second script called realignCalendarTables.js, which comes with CalendarWizard.
Double-click the realignCalendarTables.js script to launch it. If you have one of the tables selected, it assumes that the selected table is the master—the one all other tables should match. If no calendar frames are selected, the script asks which calendars you want to realign (I usually choose All) and which layer should it assume is the master calendar. This script is easy and painless and saves a huge amount of time (Figure 9).
If your frame size changes, you'll want to use the fitCalendarToFrame.jsx script, which does pretty much exactly what it says: The calendar stretches out to match the new frame size. Note that if you've adjusted rows or columns, those changes are lost—all the cells are of equal size after you use this script. Figure 7: CS3's Cell Styles and Table Styles panels.
how to make a calendar in indesign
Source: https://www.printingforless.com/InDesign-Calendars.html
Posted by: higginbothamfacking.blogspot.com
0 Response to "how to make a calendar in indesign"
Post a Comment